Support
Learn how to make the most of Groove Shed.
Need a hand with something not covered here? Email support@shed.music.
Getting started with Groove Shed
Read more
At the heart of it is the rhythm engine. It listens to you play and plots every note on a timeline, showing where your timing actually lands: center, ahead, or behind, and by how much. It isn’t there to tell you what’s right or wrong. Sometimes you want dead-center, sometimes laid-back, sometimes driving just ahead of the beat. Whatever feel you’re after, the data shows you how close you’re getting.
Three things will get you the most out of it:
- Subdivision setting. This controls the click editing grid, and it also decides what the analysis listens to. Set it to 1 and only the main beats are analyzed; 2, 3, or 4 adds your 8th notes, triplets, or 16ths.
- Project folders. Make a folder for each thing you’re working on and record every take of it there. That’s what lets you compare your progress on that thing over time.
- Wired headphones. If your click or loop feeds into the microphone, it skews the analysis. Headphones make sure the app only hears you play. See Audio setup for every option.
There’s also a programmable 4-track sequencer and a big library of life-like drum and percussion loops to practice against. If the library doesn’t have what you need, the click editor lets you build it yourself.
Enough reading, let the shedding begin.
How to use the analysis feature
Read more
Time feel can be measured, and that’s what Groove Shed does. Milliseconds won’t mean much to a musician at first, so here’s how to read them.
Before you record
In short: your subdivision setting decides what the analyzer listens to. Set it before you hit record.
Subdivision 1 analyzes only what you play around the main beats. Set it to 2, 3, or 4 and the subdivisions between them are analyzed too. The swing dial controls how those subdivisions groove, and your playing is measured against both settings.
Anything you play outside the analysis window is ignored entirely. That’s deliberate: the microphone hears every sound you make, not just the ones you meant to play, so ignoring the space between grid positions filters out collateral noise and keeps your results reliable.
Basic vs Advanced mode
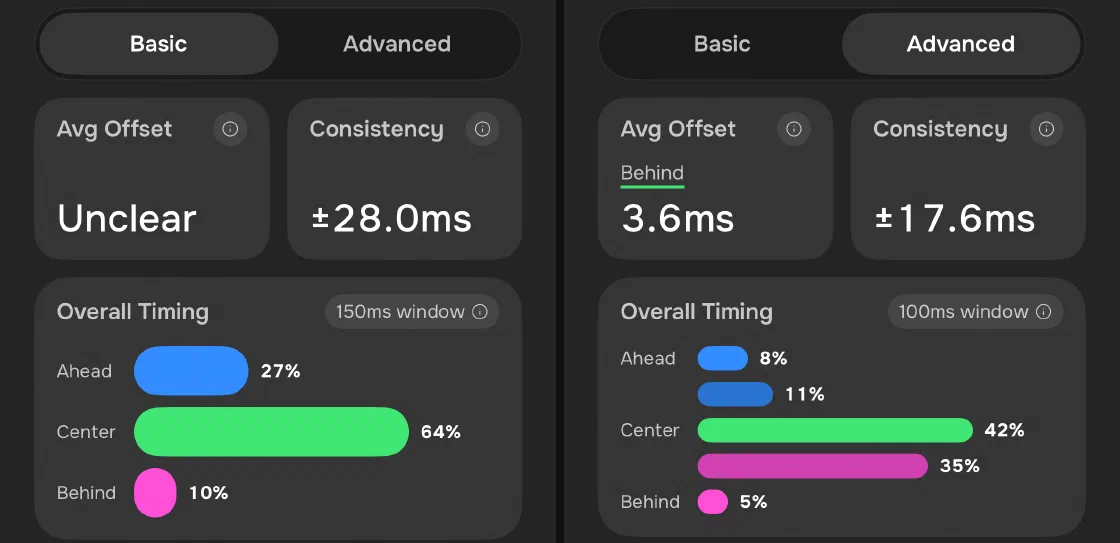
Basic looks at the big picture: whether you land consistently around center time or clearly off to one side. It uses three 50ms buckets across a ±75ms window, which is what you want while you’re still building the foundation and fine detail wouldn’t mean anything yet.
Advanced zooms in, with five 20ms buckets across a tighter ±50ms window, for practicing the fine nuances of feel. It needs wired headphones or an audio interface.
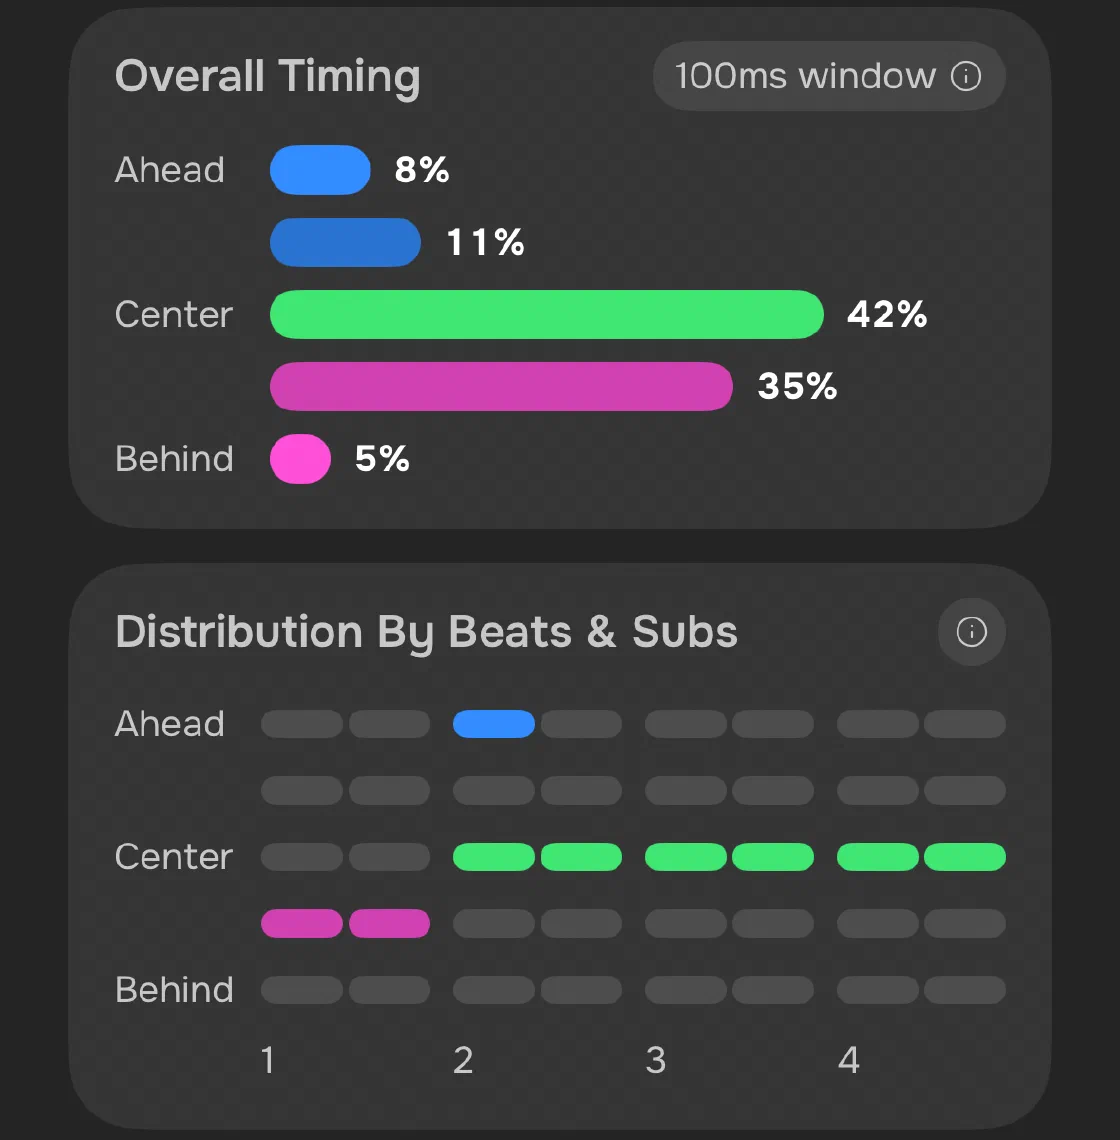
Both modes include the beat-by-beat breakdown.
The two diagrams
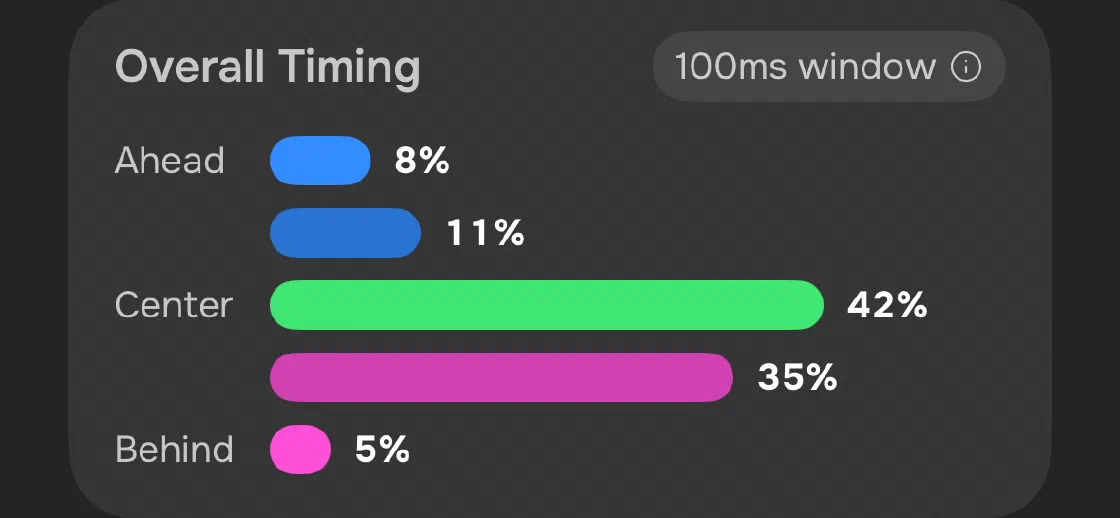
The histogram shows your overall timing, your main tendency in the big picture. The beat-by-beat diagram shows where you land across each beat and subdivision, which connects the result to the material you’re practicing and points at exactly where you’re playing the way you want, and where you’re not.
The millisecond game
In short: under ±10ms is professional-tight. 10–30ms off center is a deliberate feel. More than 30ms reads as rushing or dragging.
These numbers are instrument-specific, so don’t measure a guitar reading against a drummer’s, or EDM against samba. As averages, they’re a good guide:
- ~5ms is the limit of human perception. Two sounds less than 5ms apart are heard as simultaneous.
- ±10ms is what the most precise drummers hold on a repetitive groove.
- ±15ms generally sounds tight for other rhythm-section instruments.
- 10–30ms ahead of center feels driving and energetic. More than 30ms sounds like rushing.
- 10–30ms behind feels laid-back and relaxed. More than 30ms feels like dragging.
The window sizes are built around this. In Basic mode, ahead or behind means you’re clearly rushing or dragging. In Advanced, one step off center is a feel; two steps is rushing or dragging.
Average offset and consistency
Average offset is where the center of all your notes sits. Inside ±5ms is beyond human perception and will be experienced as dead on.
Consistency is how widely your notes are spread, ignoring obvious outliers as brainfarts. Under ±10ms is very tight, the territory of good professional drummers. Around ±30ms is a bit here and there; past ±40ms sounds all over the place.
Reading your results in context
Your results are always relative to what you play. Material at the edge of your ability reads very differently from material that’s easy for you, and the more repetitive it is, the tighter your numbers.
So compare like with like. Record one thing per project folder and the folder becomes your practice journal for it, with earlier takes against later ones showing actual progress.
Optimize your audio setup
Groove Shed is designed to give you a quick, no-hassle recording experience with whatever gear you have. The short version:
- Wired headphones or an audio interface. Advanced analysis, no calibration needed. The most accurate timing you can get.
- Bluetooth headphones. Basic analysis after a one-time calibration in Settings. AirPods perform best.
- No headphones. Basic analysis when you play to a click; analysis is off when you play to a loop.
The click sequencer, the loop library, recording and listening back all work the same on any setup.
Read more
Wired headphones
Ultra-low latency, the most reliable analysis, no calibration. The catch is the jack:
- USB-C (iPhone 15 and later, most iPads from 2022 onwards). Use any USB-C to headphone jack adapter or USB dongle. USB-C earbuds work too, though they tend to cost more.
- Lightning (iPhone 14 and earlier, older iPads). Use any Lightning to headphone jack adapter.
- Built-in jack (some pre-2022 iPads). Plug straight in. We haven’t fully tested this combination, but it should work.
Bluetooth headphones
Fine for click and loop playback. For recording, no Bluetooth gear can reach Advanced analysis.
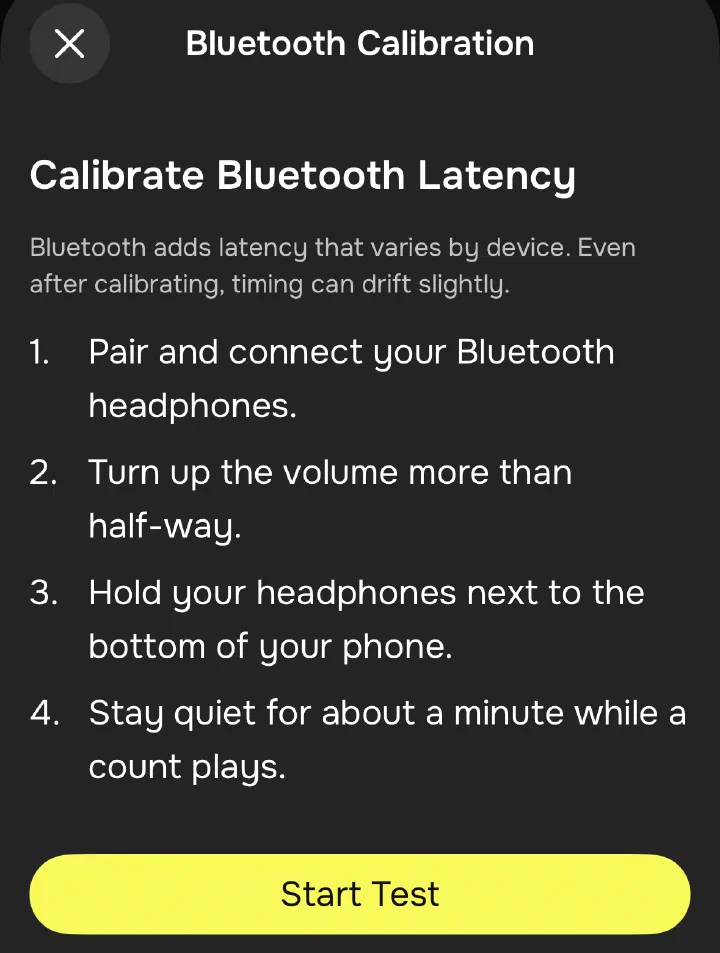
AirPods work best, with low latency and very little drift, so they’re reliable for recording against a click and getting good Basic analysis. Other brands vary a lot with the quality of their components; our calibration makes better units work pretty well, but don’t expect pro-level sync. Calibrate once in Settings and the app takes care of the rest.
No headphones
The click sequencer and loop player work perfectly, and so does recording and listening back to yourself. Only the analysis is limited.
That comes down to the speaker playing into the room, with the microphone picking it up alongside your playing. The app can clean a click out of the audio well enough for Basic analysis. Drum loops are too busy to separate reliably, so analysis is disabled with loops.
One thing to know: count-in is off by default, and Basic analysis needs it to identify the click. Record without headphones with count-in off and Groove Shed will ask whether to turn it on, record anyway without analysis, or cancel, then remember your choice.
Audio interfaces
USB audio interfaces generally work, and they’re especially useful for hard-hitting drummers: iPhone microphone gain is fixed and clips beyond 104dB, while an interface lets you set the gain yourself. We haven’t put interfaces through extensive testing yet, so treat this as an early read. We’ll expand this section as that work progresses.
Frequently Asked Questions
Is this a subscription?
What happens after the 14-day trial?
How can I get a refund?
Refunds for App Store purchases are handled by Apple, not by us.
- Sign in at reportaproblem.apple.com with the Apple ID you bought the app with.
- Choose “I’d like to” → “Request a refund.”
- Pick your reason, then Next.
- Select Groove Shed and submit.
Apple usually replies within 24 to 48 hours. If approved, the refund goes back to your original payment method. Timing varies by payment type.
What instruments does Groove Shed work with?
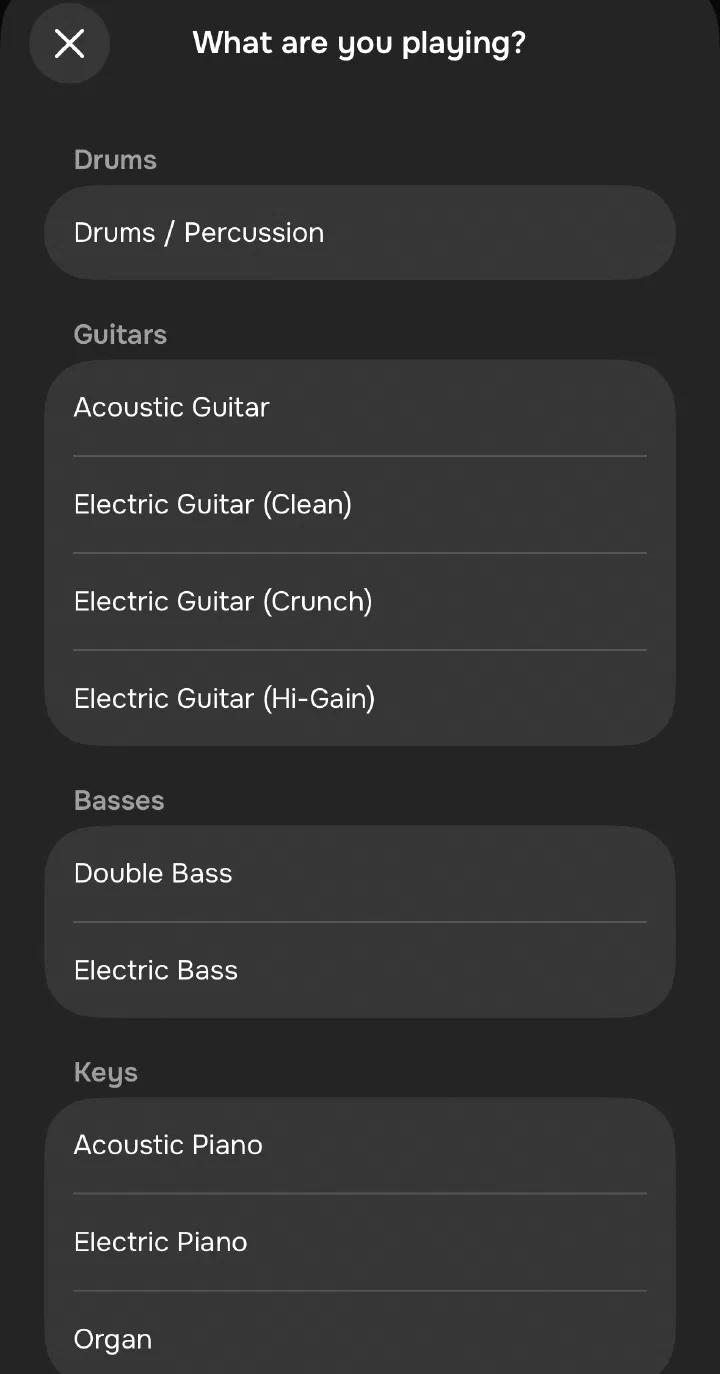
Drums, percussion, bass, guitar, acoustic piano, electric piano, and electric organ get full support, because the analysis engine is built and tuned specifically for these rhythm-section instruments. Pick yours from the instrument selection menu.
Winds, vocals, strings, and anything pitched outside that list run on the general-purpose “Pitched non-percussion” engine. You still get real analysis, but a softer attack (a bowed note, a sustained vocal) can read 5 to 15ms late, since the engine has to interpret where a slower rise actually started. Instrument-specific tuning is coming in future updates.
What about Bluetooth?
Do I need wired headphones?
What's the difference between Basic and Advanced analysis?
Does it work on iPad?
Can I use it without headphones at all?
Can I use it with an external audio interface?
Still need help?
Questions, bug reports, feedback: email support@shed.music.
shed.music oy · Kiviparintie 9 F 74, 00920 Helsinki, Finland · Business ID (Y-tunnus): 3622629-8